Tarot Core Objects
This guide explains the core objects used across Tarot and what they are used for.
You will see these objects in many parts of the platform. Understanding them helps you plan routes, manage deliveries, and clearly see how your data affects routing results.
Jobs
Jobs represent delivery or pickup tasks that must be completed as part of a route.
Each job contains the key information Tarot needs to plan, schedule, and execute the work.
Create / Edit Job
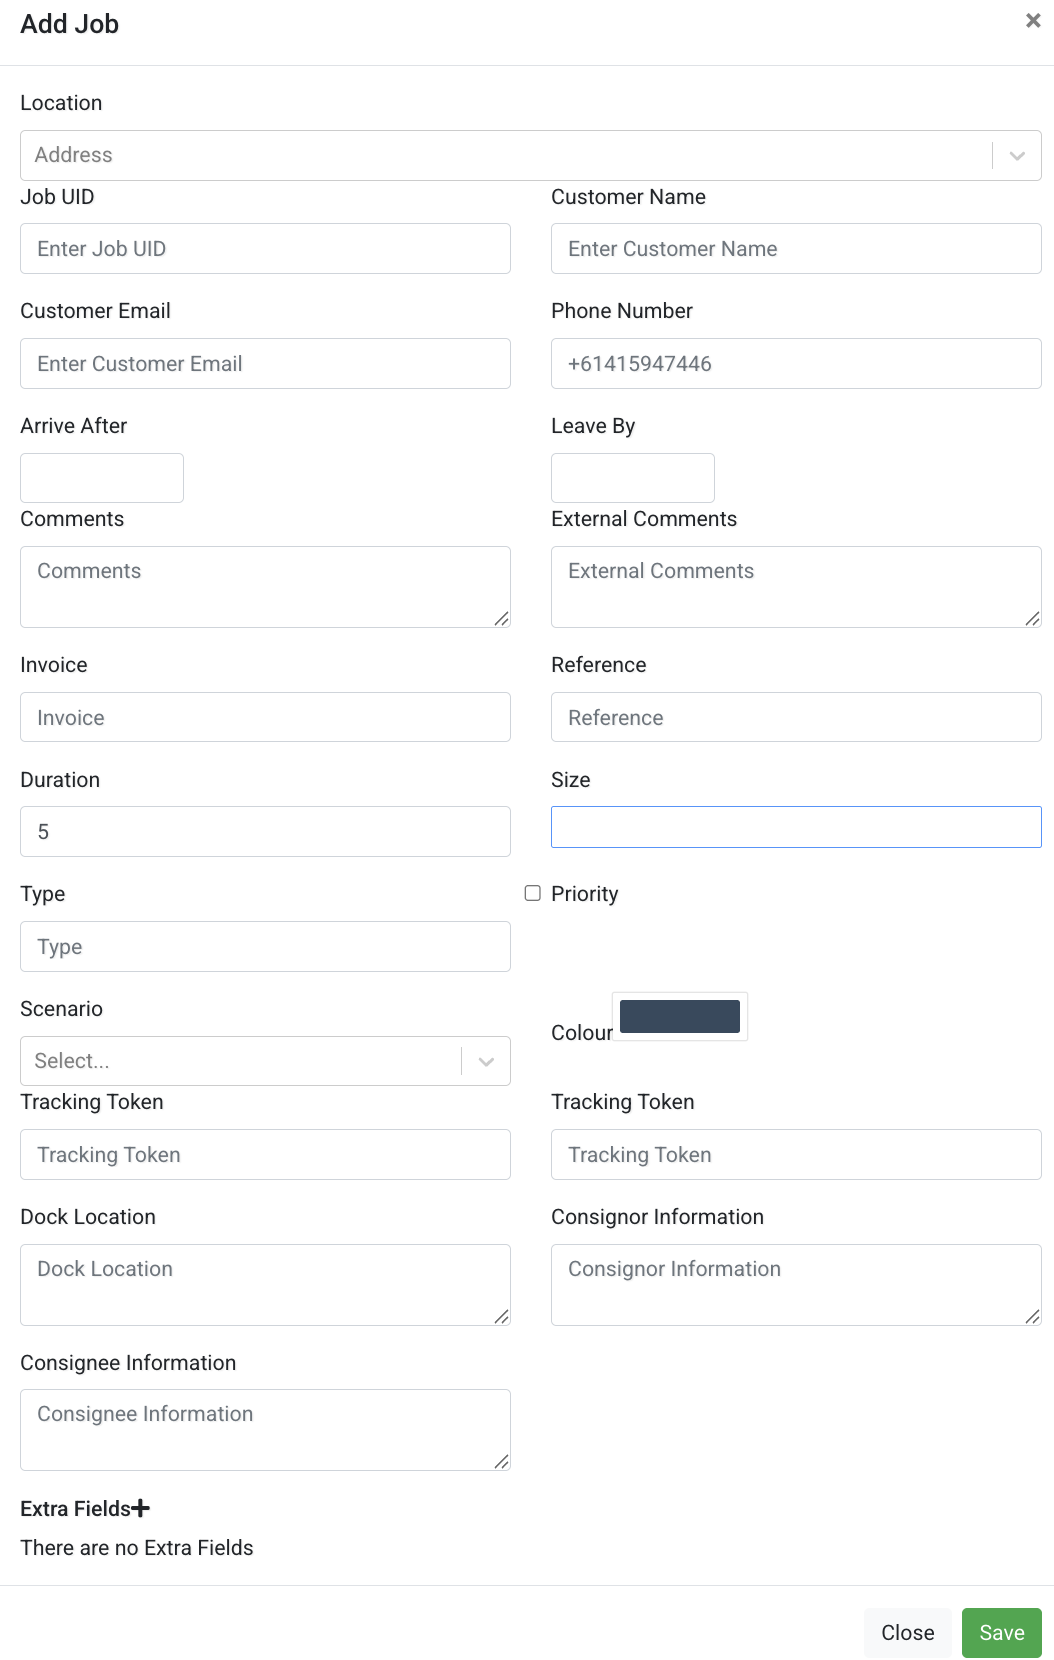
Use the job modal to describe what needs to be delivered, when it must happen, and under which constraints.
Configure the following fields:
- Location
- Job UID
- Customer Name
- Customer Email
- Phone Number
- Arrive After
- Leave By
- Comments
- External Comments
- Invoice
- Reference
- Duration
- Size
- Type
- Priority
- Scenario
- Colour
- Tracking Token
- Dock Location
- Consignor Information
- Consignee Information
Jobs belong to Scenarios and later grouped into Runs for route planning.
You can also attach one or more Units to a job to represent individual items being transported.
Units
Units represent individual shipment items, packages, or parcels linked to a job.
Units do not affect route optimisation, but they help you track what is being delivered and provide detailed proof and reporting.
Create / Edit Unit
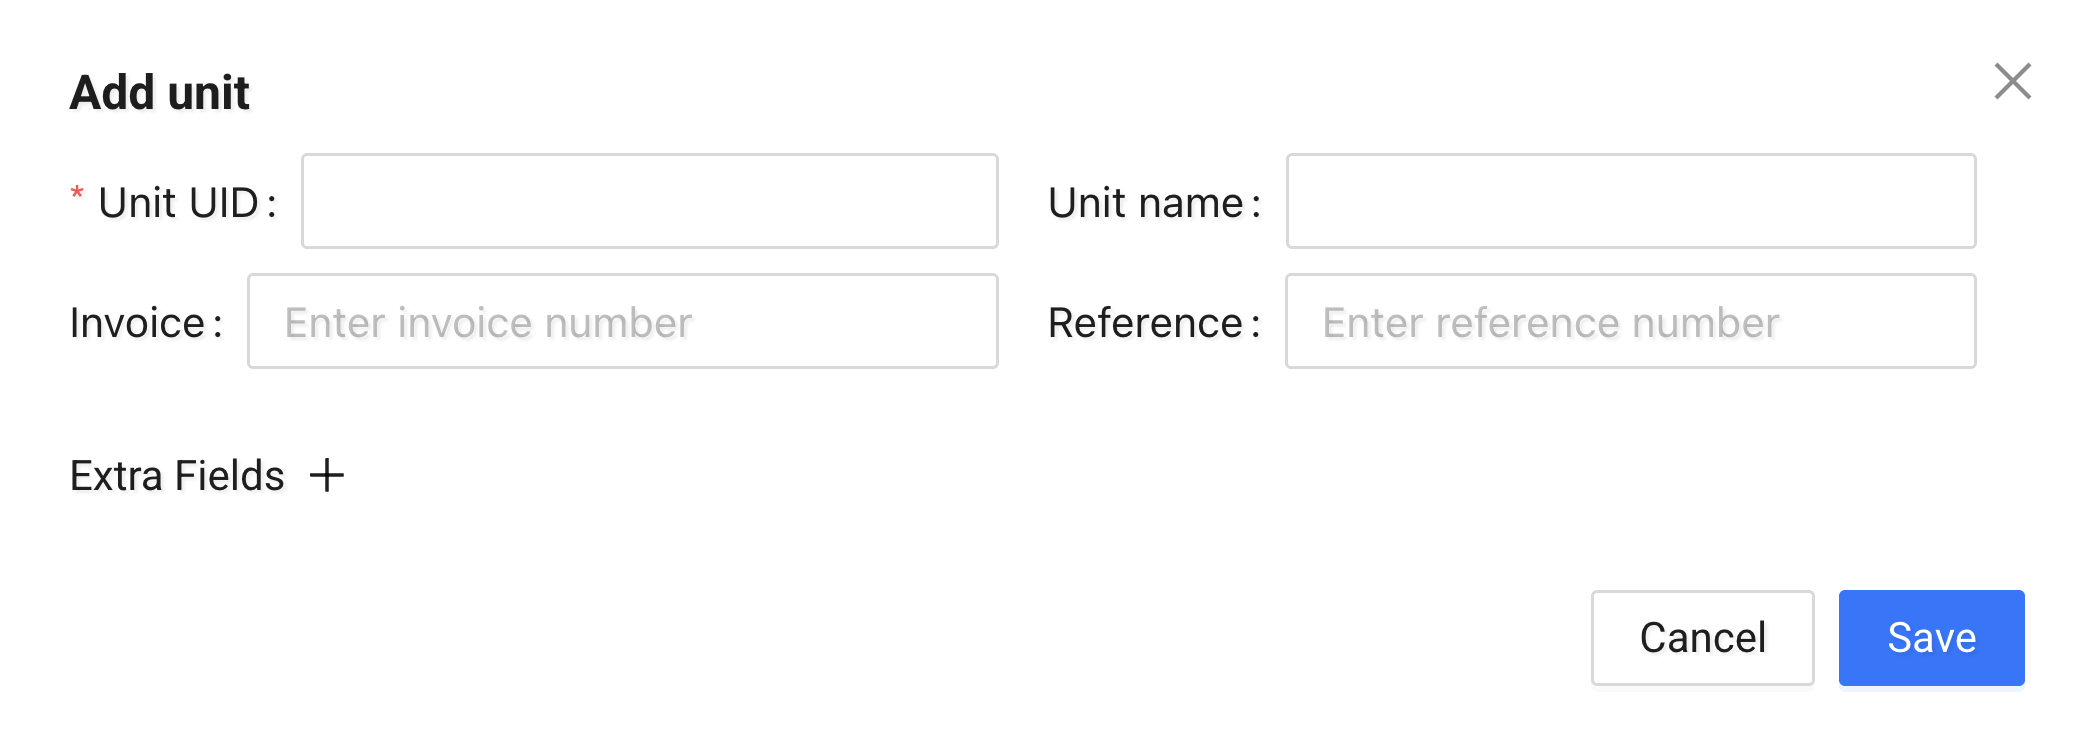
Use the unit modal to attach item information to a job.
You can configure:
- Unit UID
- Unit Name
- Invoice (optional)
- Reference (optional)
- Job
You can also attach Extra Fields to store additional details such as weight, volume, or product identifiers.
Unit UID and barcodes
In Tarot, the Unit UID is usually a barcode.
You can scan this barcode in the mobile app to: - mark the unit as loaded - mark the unit as delivered
For a step-by-step walkthrough, see the Driver Quickstart page.
If you don’t have barcode labels, you can also:
-
Print barcode labels directly from Tarot
Generate and print barcode labels using Tarot’s barcode printing feature.
(Link: How to print barcode labels from Tarot) -
Turn off barcode scanning in Tarot
Disable barcode scanning in your organisation’s App settings, use an item name as the Unit UID, and mark units as loaded and delivered using a checklist in the mobile app.
Choose the option that works best for your team — Tarot works with or without barcodes.
Returns
Returns represent goods that need to be taken back during a job.
You usually create a return when a delivery cannot be completed as planned — for example, if a customer refuses the delivery.
Returns are always linked to a Job and do not exist on their own.
Using returns lets you record reverse movements without creating a separate job or route.
Create / Edit Return
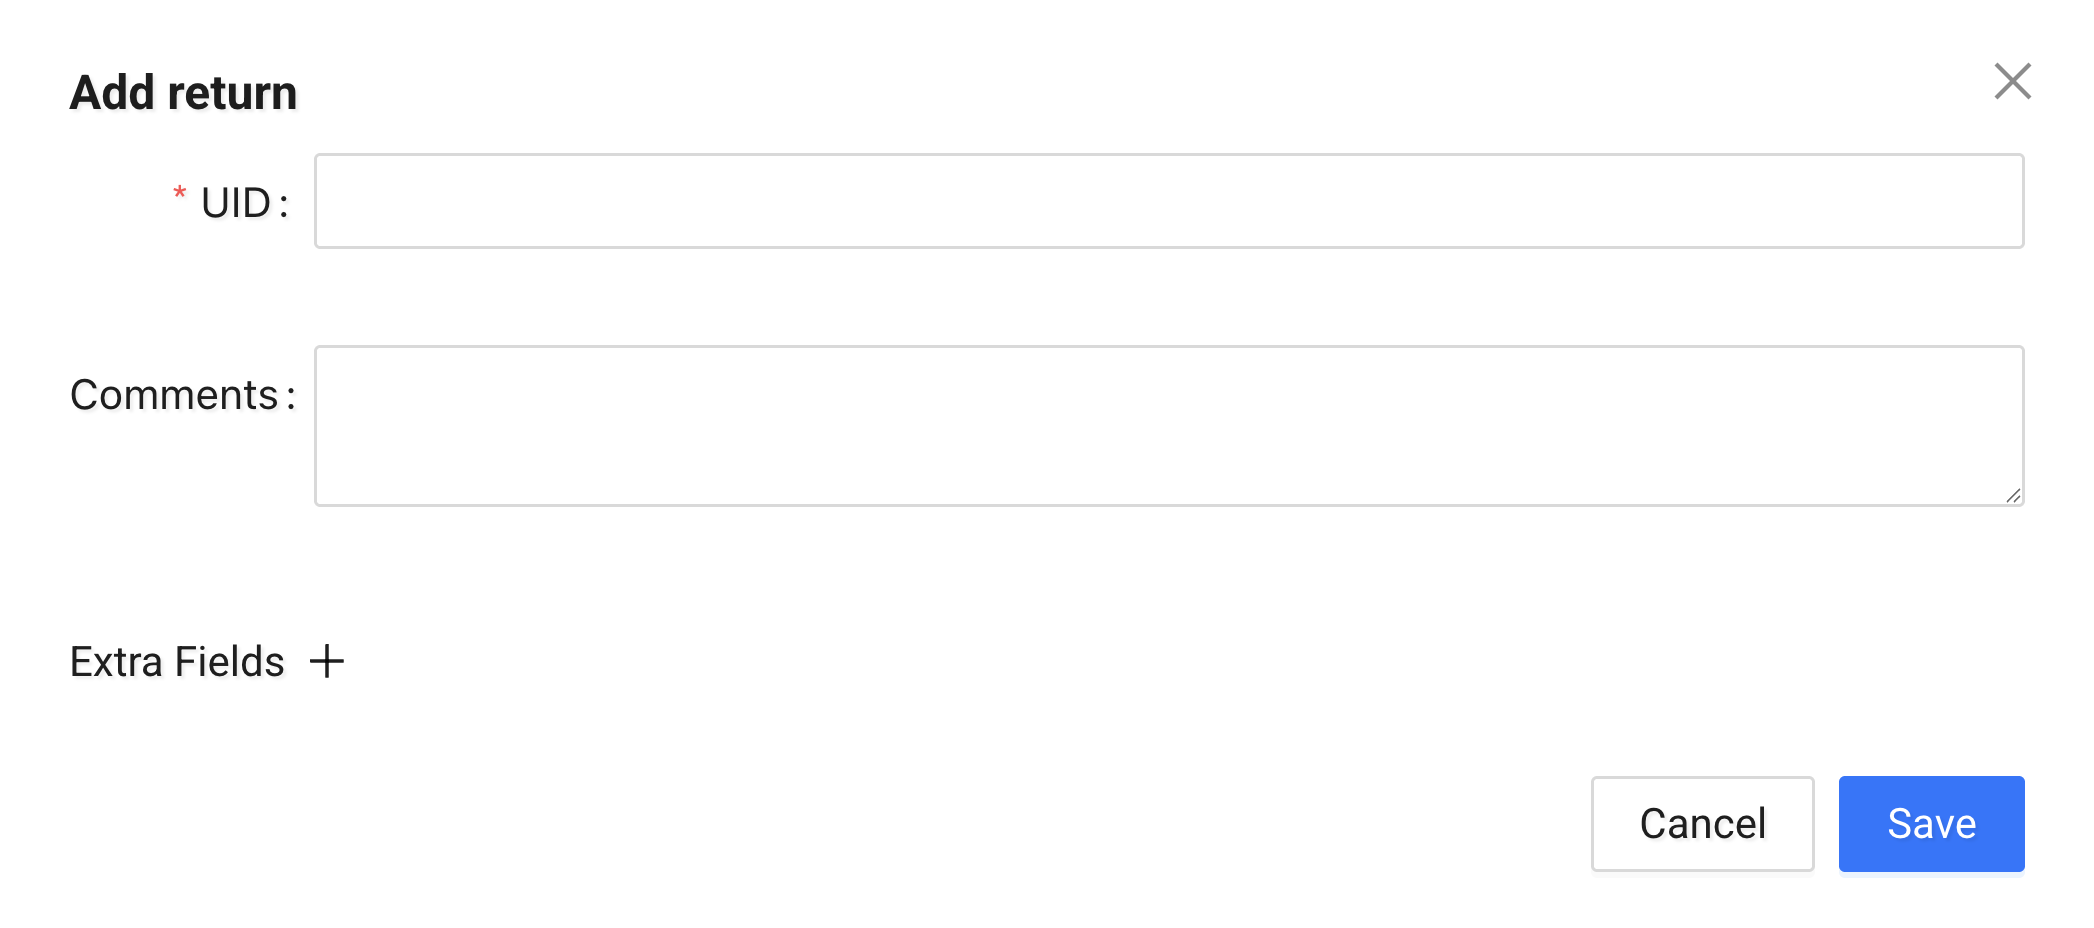
When you create or edit a return, configure the following fields:
-
UID
A unique identifier for the return within the job. -
Client
The client associated with the return.
This usually represents the pickup or return location. -
Comments
Use this field to explain why the return was created or add handling instructions. -
Extra Fields
Optional custom fields for additional return information.
Returns can have Proofs submitted via the mobile app, similar to units and containers.
See Returns in the mobile app for details. (Link placeholder)
Containers
You use containers to group multiple Units into a single physical container, making it easier to track how goods are handled during transport.
Containers are created through the mobile app, where drivers scan and assign units to a container during operations.
Info
Container creation and workflows are handled in the mobile app.
See Containers in the mobile app for details. (Link placeholder)
Containers can have Proofs submitted during loading and unloading in the mobile app.
Drivers
Drivers represent real drivers, including their shifts, vehicles, and limits.
Accurate driver setup is important for realistic route planning.
Create / Edit Driver
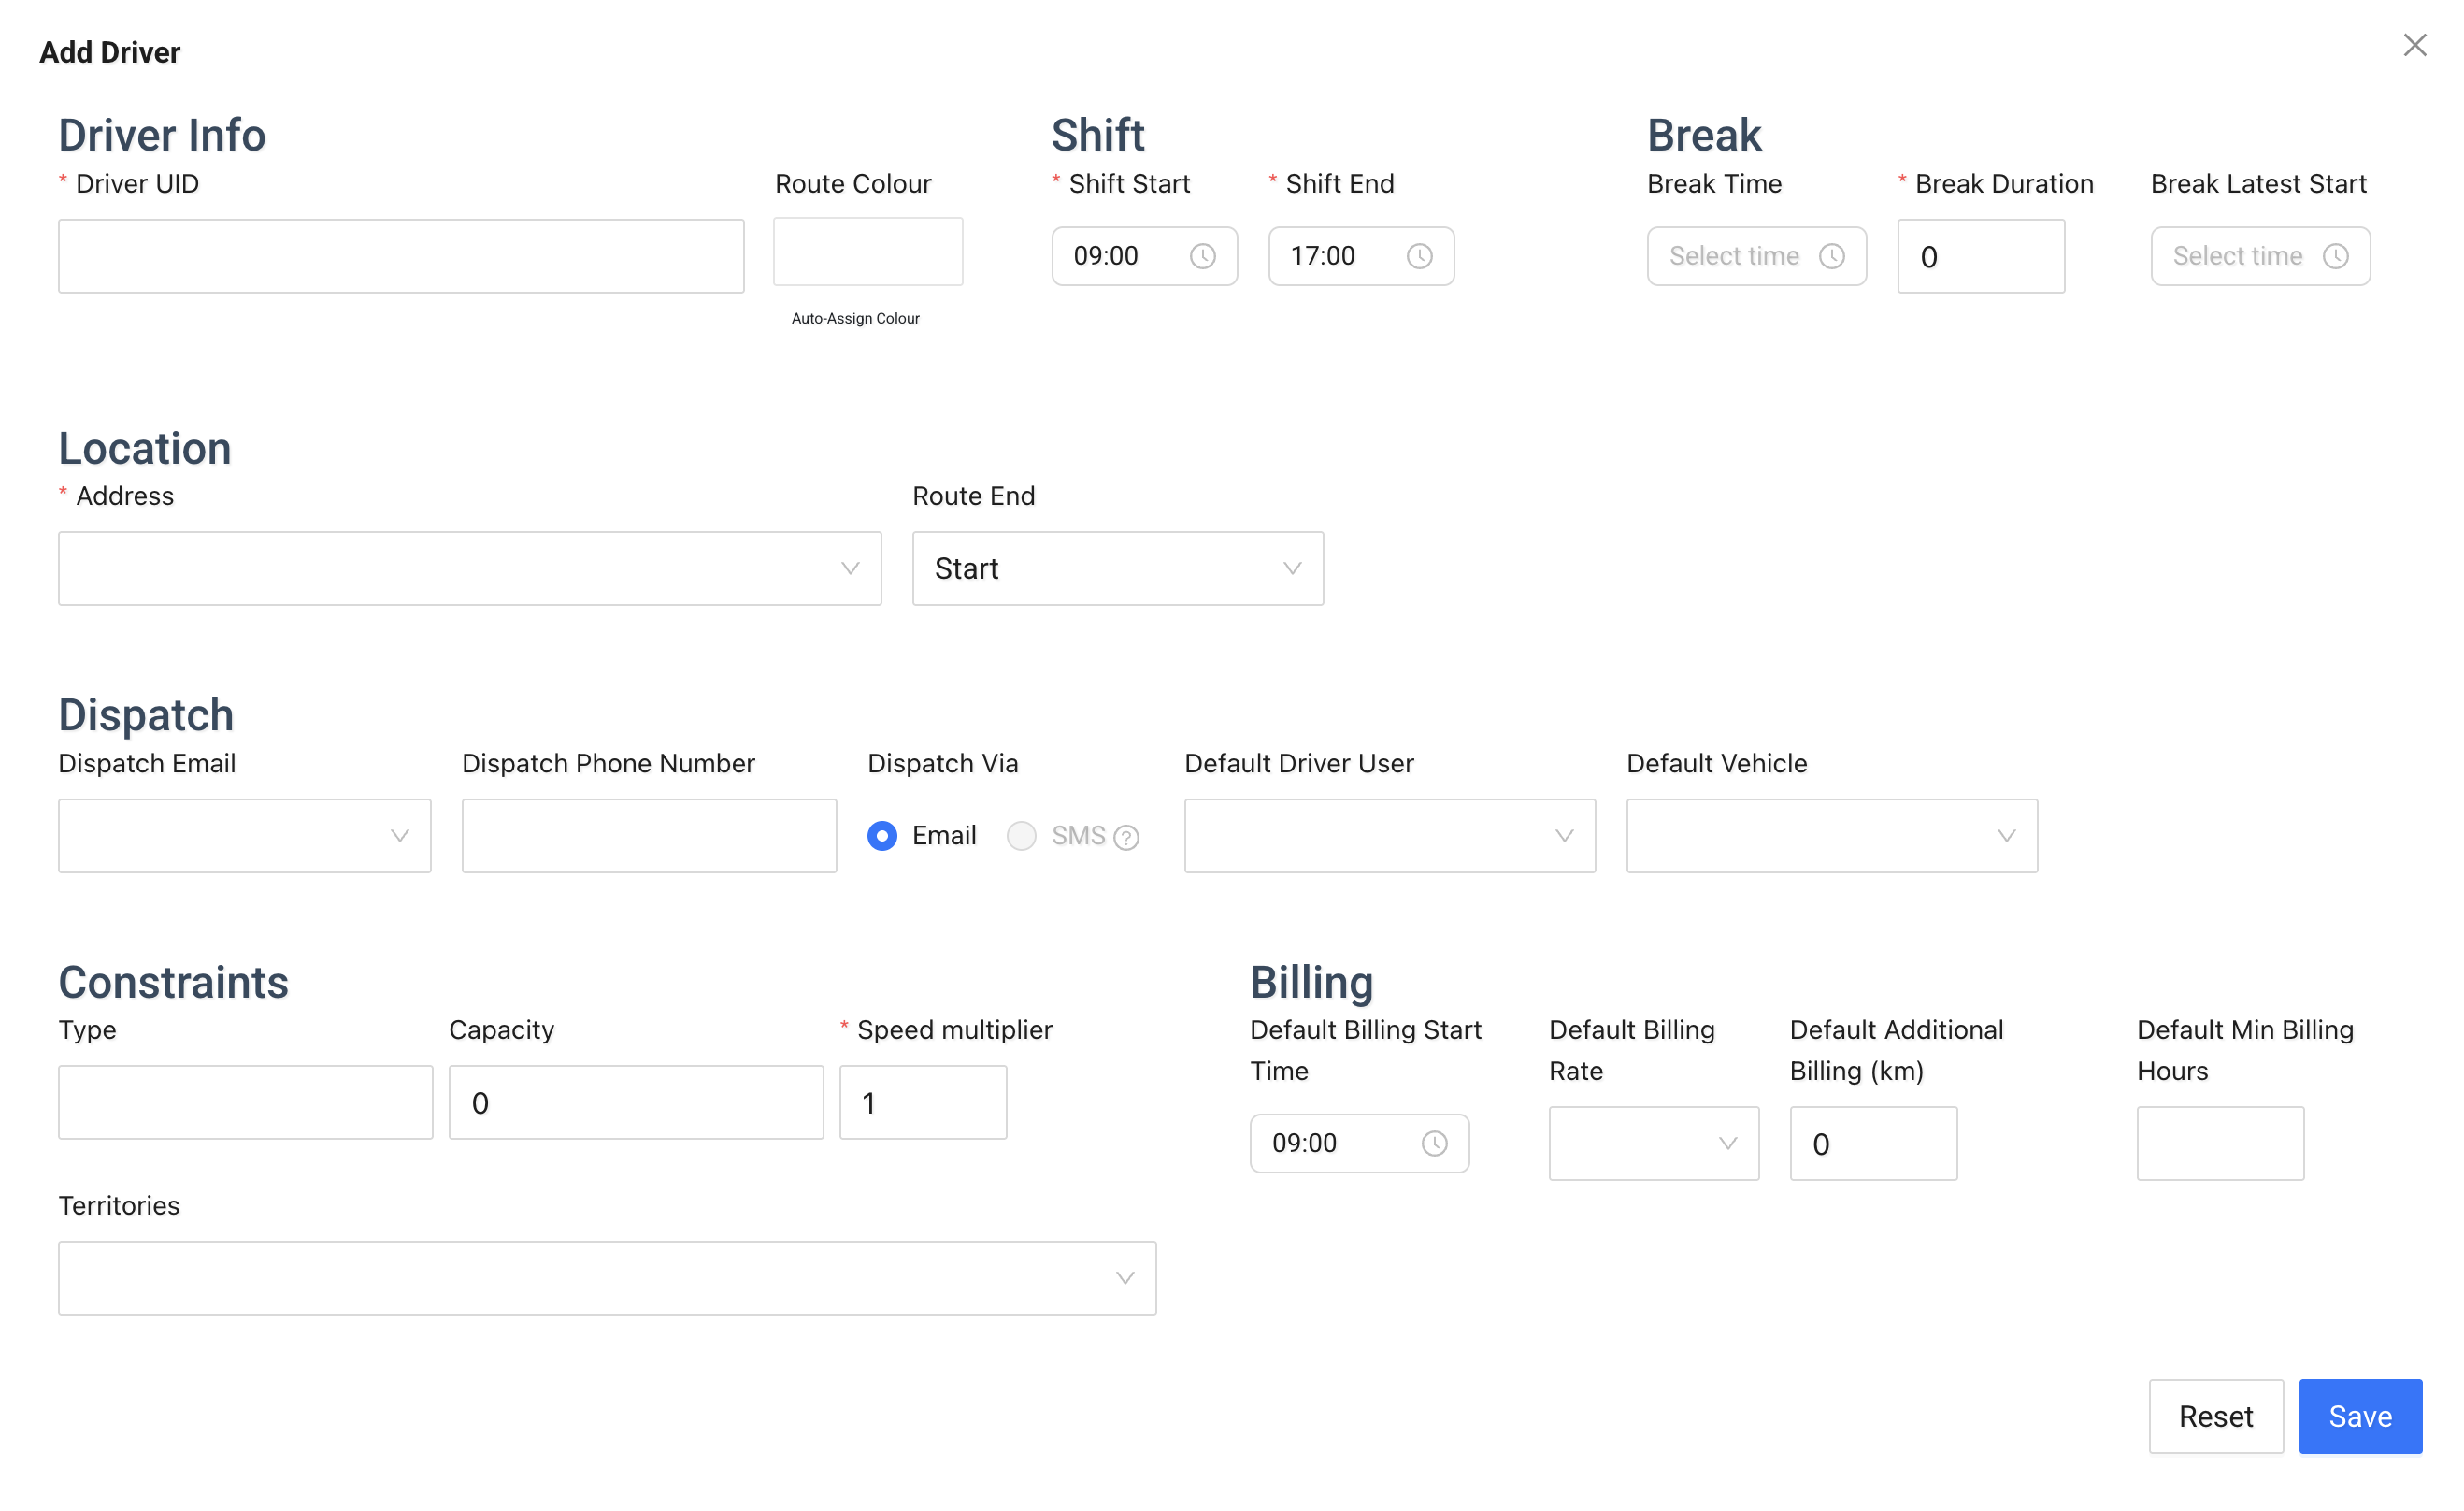
Use the driver modal to describe availability, capabilities, and constraints.
Configure the following sections:
-
Driver Info
Driver UID and route colour. -
Shift
Shift start and end times. -
Break
Break time, duration, and latest allowed start. -
Location
Start and end locations for the route. -
Dispatch
Dispatch method, contact details, default user, and vehicle. -
Constraints
Capacity, speed multiplier, territories, and type. -
Billing
Default billing start time, rates, additional distance, and minimum billing hours.
Driver settings directly affect how the routing engine sequences and optimises Job.
Runs
Runs represent planned routes for a single driver within a specific scenario.
A run defines how jobs are executed during the day.
Each run references: - a Driver - a Scenario - one or more Jobs
Create Run
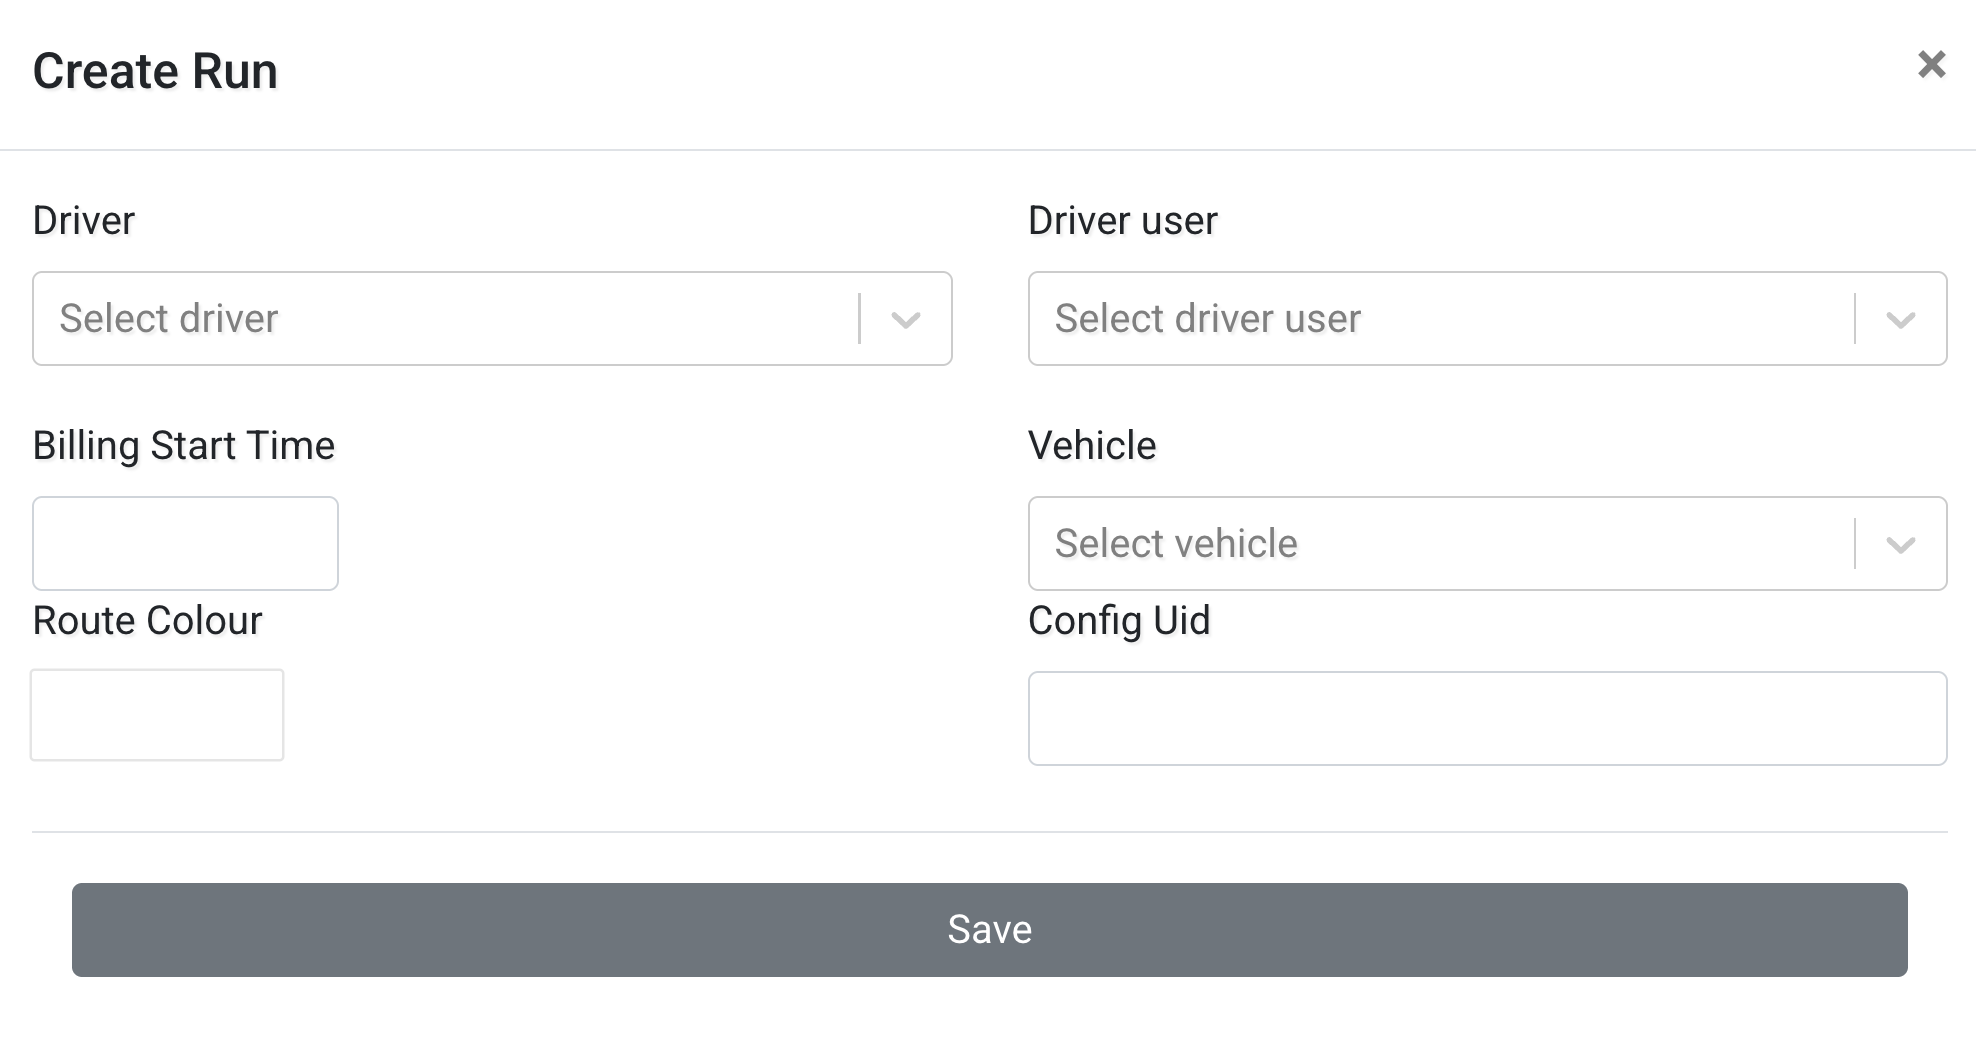
To create a run:
- Select a Driver.
- Select a Scenario.
- Save the run.
After creating a run, you can assign jobs and prepare the route for optimisation.
Scenarios
Scenarios group jobs and runs for a specific planning date.
They allow you to plan routes without affecting other days.
Create / Edit Scenario
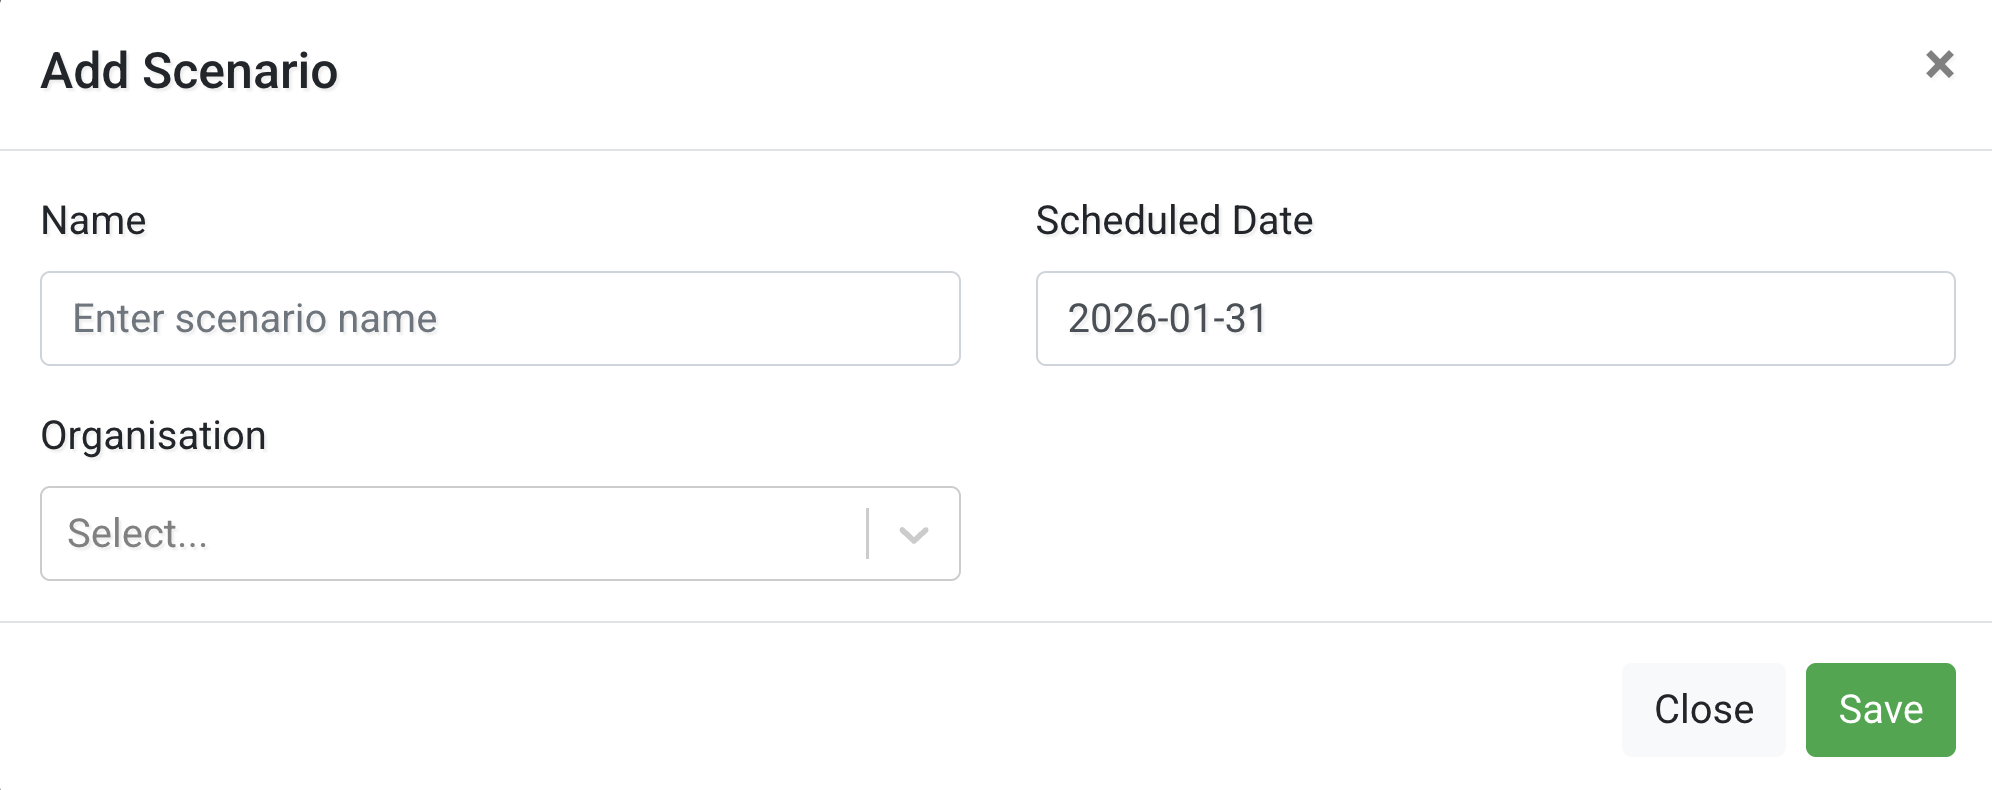
You can configure:
-
Name
The scenario name shown across Tarot. -
Scheduled Date
The date used for planning and optimisation. -
Organisation
The organisation this scenario belongs to.
Scenarios are referenced by Jobs and Runs during planning.
Bulk Create Scenarios
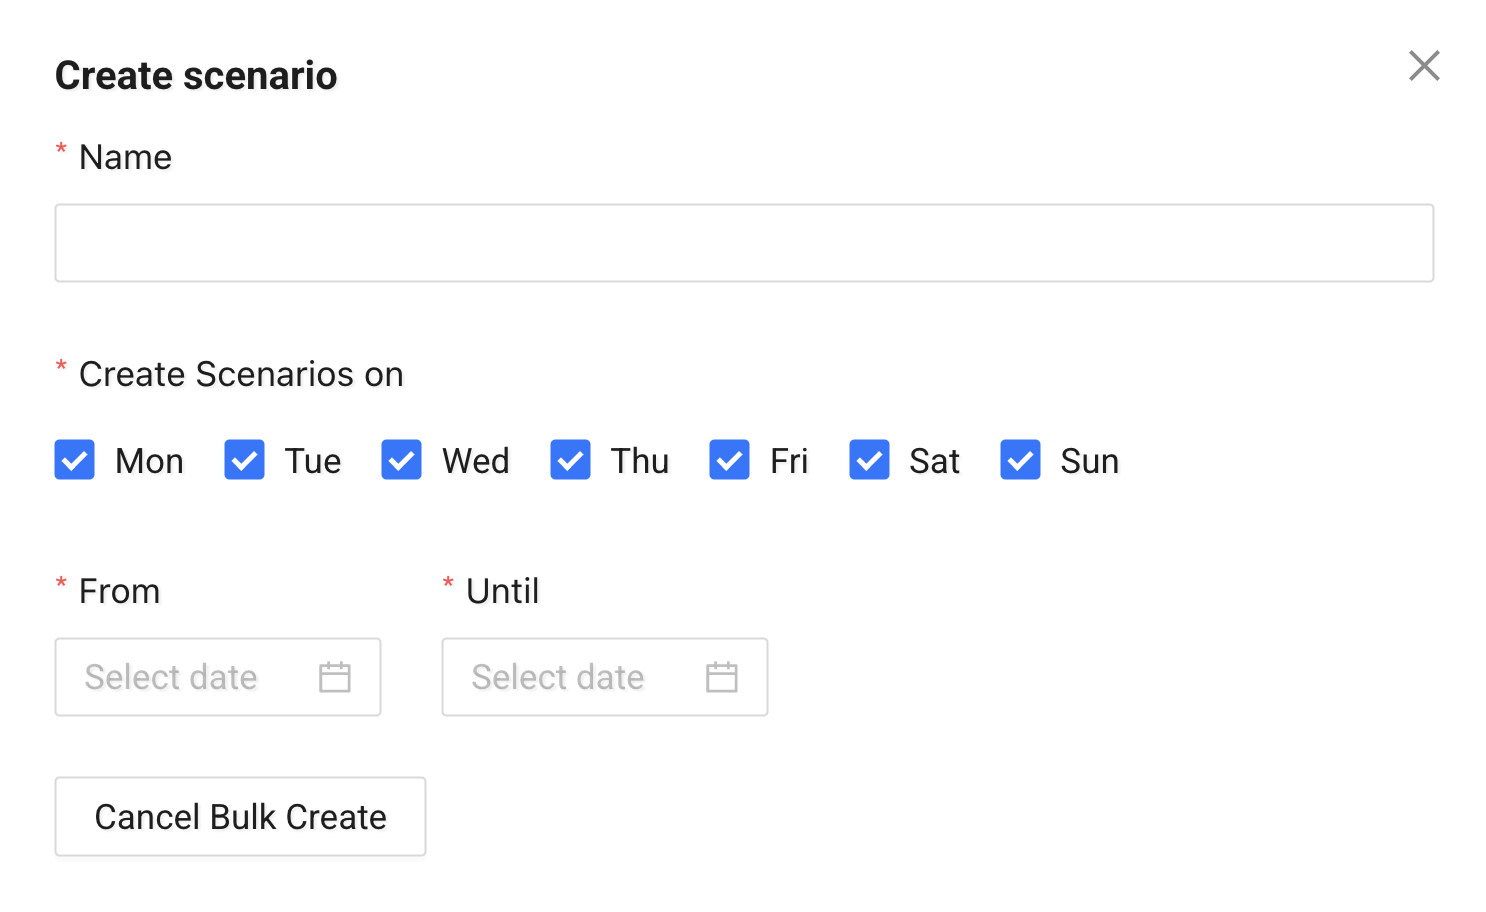
Bulk creation helps you quickly prepare multiple scenarios at once.
This is useful when you: - plan across multiple dates - prepare scenarios in advance - run repeated operational workflows
Proofs
Proofs store evidence collected during job execution, such as signatures, photos, locations, and timestamps.
Proofs help confirm that a job was completed as planned and provide provide clear records for support, billing, and audits.
Submitting proofs
You can submit proofs in two ways:
- From the mobile app
Drivers collect proofs directly during execution.
See Proofs in the mobile app for details.
- From the Tarot platform
Proofs can be added manually from the Job Actions section inside the Progress Report window.
(Link placeholder: How to use the Progress Report window)
Viewing submitted proofs
Once a proof is submitted, you can review it in the Proof Information window.
This window shows all collected evidence for a specific job.
Proof Information window structure
Header
Shows basic job details:
- Job reference and client name
- Address
- Scenario the job belongs to
This helps you quickly understand what the proof relates to.

Timeline
Shows the key stages of the job with timestamps:
- Created
- Planned
- Started
- Delivered / completed
The timeline helps you verify when each stage occurred.

Job proof
Shows all proofs collected for the job.
This includes:
-
Proof reason
Explains the outcome of the activity (for example, completed, failed, or partially completed). -
Photo
Visual evidence captured by the driver, such as delivered goods, location, or condition. -
Signature
A customer or recipient signature confirming completion. -
Comment
Additional notes provided by the driver.
Together, these provide a clear picture of what happened on site.
Job attachment proof
Shows proofs linked to specific objects in the job.

Job attachment proofs are organised into tabs:
Each tab shows proofs submitted for the selected object type.
Units / Returns / Containers tabs
For each item, you can see:
- Unit ID
- Load status and timestamp
- Unload status and timestamp
- Proof Details button
Use Proof Details to review the full proof for a specific item.
This makes it easy to verify delivery, collection, or handling.
Download Proof of Delivery (PoD)
At the bottom of the Proof Information window, you can download a Proof of Delivery file.
You can share this file with clients or keep it for records.